25 September 2021

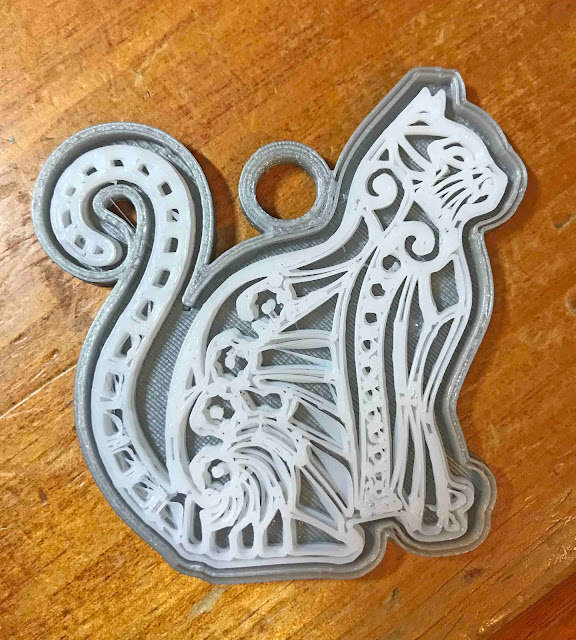
Creating a two tone pendant in Silhouette Alta.

hi there everyone!
Today is a quick  tutorial on how to use 2 different colour filaments to make a two tone pendant.
Given this file ended up not the best to print, the way to create it is still the same.


1- Open the Silhouette Alta software. Click on the library tab on the right side.


2- Select a design you would like to use. Double click on it.


3- A new window will appear. Click on the wax pendant icon.


4- Adjust the size of your design.


5- With the design selecting, right click and ungroup.


6- Separate the inside from the base.


7- To make the hole for the pendant, click on the shape tool and then select the tube shape.


8- Move the tube to where you would like it on your design.


9- Lower the height so it is the same as the backing plate.


10- Select both the tube and the backing plate and right click then group.


11- Click on the 3D print icon. The base is ready to print. Adjust the print settings and print.


12-

13- Select the insert of the design. Adjust the print settings and change the filament colour. Print your design.


14- Print your insert.


15- Change your filament and print your base.


16- Using filament glue adhere the both together.


09 September 2021

Foiling on vellum with the Heidi swap minc machine

Hi there! today I will be sharing with you all how to foil on vellum using the minc machine.
It is good to note that when i looked for a good vellum to foil the Heidi Swapp Minc vellum actually was the easiest to use. some of the vellums I found were too porous or so thin that the toner seemed to crack when I  foiled it. 
In this tutorial i used the HS vellum.

1- Open the software program that you will use to print on the vellum.


2- Select your design. I am using My valentine has fur bundle from designbundles.net


3- Select your design and resize.


4- Once resized select the print icon.


5- A print window will pop up. Click on the preferences.


6- Select vellum on the paper type and then make sure that the high print quality is set.. click ok and print.


7- You design is printed onto the vellum.


8- Place the foil over the vellum and place into a transfer folder.


9- Turn on the Heidi swap minc machine. Set to number 2 for vellum and run the transfer folder through.


10- Your design is foiled.


20 July 2021

How to foil acetate using the Heidi Swapp Minc machine

Hi there! I hope everyone is doing well!
Today I'll be showing everyone how to foil acetate using the Heidi Swapp Minc machine and Silhouette Studio. When using acetate and a printer make sure you have purchased the correct acetate for your printer. there is inkjet and laser films out there and the wrong one will not work. 
Ok so lets check out the tutorial!

1- Open the software you are using to print your design/text. I am using silhouette studio.
Click on the text icon.


2- Type your text. Select the text style icon.


3- Change your font. I am using the font Timberly script from fontbundles.net


4- Select your text and adjust the spacing so the text overlaps. Next click the weld icon.


5- Click on the fill color icon and fill the text with black.


6- Next click the line icon and then line color option. Change the line color to black also.


7- Load the acetate into the laser printer. Click on the print icon. Next click preferences.


8- In the preferences options, change the the media type to transparency. Make sure your printer is set to the highest quality setting also. Click print.


9- Place the acetate into the transfer folder and place the foil over the top.


10- Set your minc machine to 2. Once it heats up and the light goes green place your transfer sheet through the minc machine.


11- The acetate is now foiled.


12- If you see any small spots that are still black you can prevent this by ensuring that your acetate has been wiped down with a microfibre cloth first. If you have a quickie glue pen you can also touch up any black spots with the glue, let dry and run through the minc machine again.


06 July 2021

How to use PSD (photoshop) files in the Silhouette Alta 3D software.

Hi there! today I will share how to use a PDF file with your silhouette Alta 3d printer.
To do this technique you will need software that can access a PDF file and save as a SVG file. I am using Silhouette studio business edition. Business edition is not free but you can usually pick the upgrade on special at many sites like swing design online. 

1- Open Adobe Photoshop. I am using photoshop elements.(you do not need to full version ) Click on the open icon.


2- Select your PSD file. Open it.


3- In the layers tab, select all the layers you do not want to use in your 3D print file. Then delete them.


4- Move the layer you have kept to the middle of your design space.


5- Go to File - save as.


6- When you save the file, save as a JPEG file, not a PSD file.


7- Go and load Silhouette Studio software. (free edition) Click on the open folder icon.


8-Your JPEG will load onto your design space. Click on the trace icon.


9- Trace your design.


10- You may need to trace the parts several times and combine them to replicate your design.


11- Delete the JPEG and only have your traced image in your design space.


12- Go to File - Save as - Save to hard drive.


13- Open the Silhouette Alta 3D software. Click on the open folder icon.


14- Fine your studio file and open.


15- A new window will appear. At this point you can choose what you would like to convert the file to. I will be creating a jewelry box.


16- Your file will convert and At this point you can either ungroup or add /remove from your design. When you are happy you can click on 3D print.


17- Your design will slice and you can print.


18- Your design is printed.